
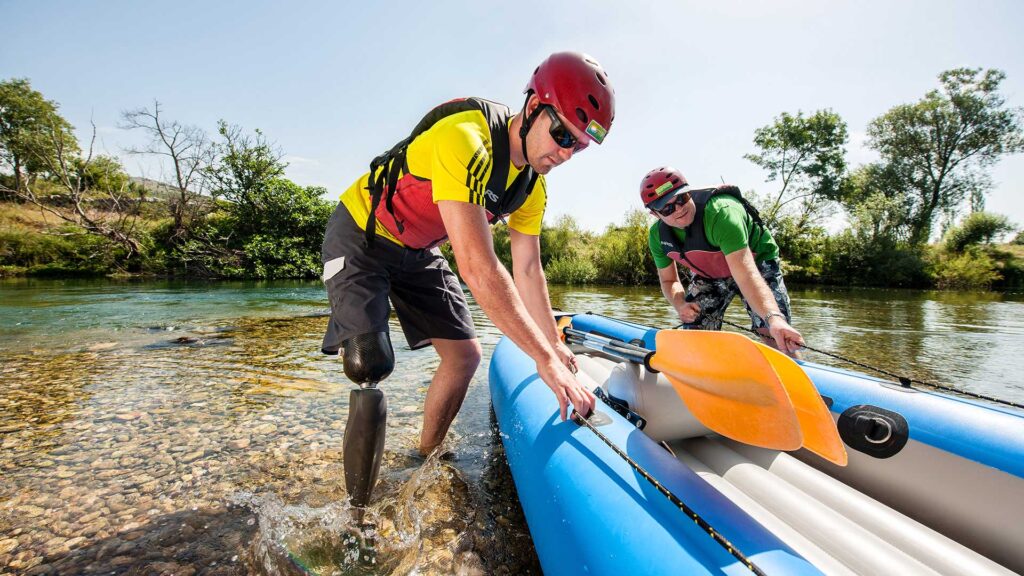
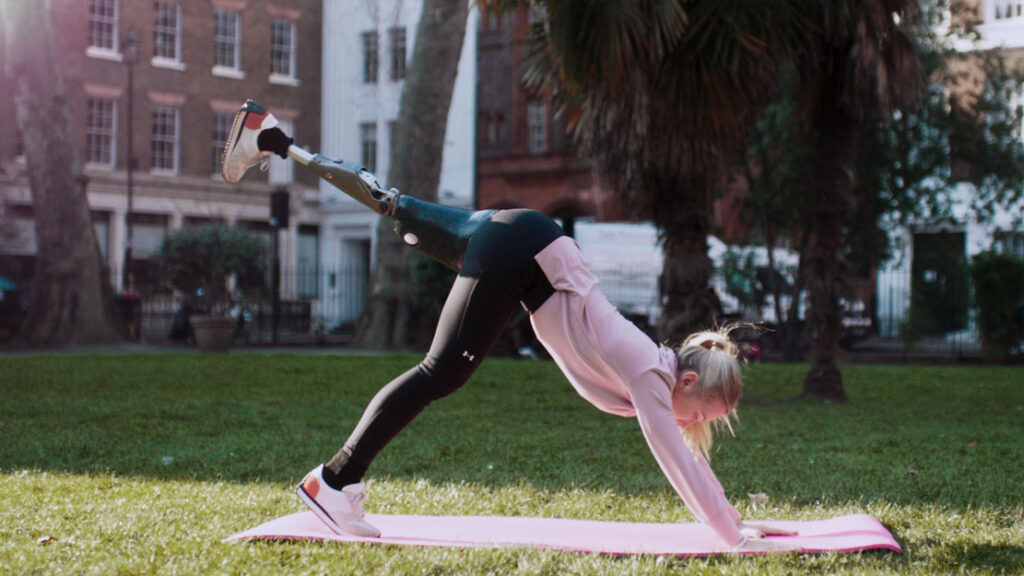
Freedom to play
Prosthetics
Our prosthetic team understands your individual needs and lifestyle. Our goal is to restore and improve the active lifestyle for patients with mobility challenges. Active Life features an extensive collection of prosthetic solutions for all types of patients and people, custom fabricated in our state-of-the-art lab by qualified technicians and prosthetists.
Upper Limb Specialties
For decades our passion for perfecting each one of our prosthetic designs has been inspired by natural movement and human achievement.
Real choices for real life: Gentle and rugged. Light activity and heavy duty. Subtle and bold. For our hands, “everyday activities” can be just about anything. For people with an upper limb difference, that means the “right hand” is all about the right balance: the combination of strength, precision,
Myoelectric
Passive Functional
Body-Powered Conventional
Lower Limb Specialties
Prosthetic Knees
For decades Active Life has focused on helping people maintain or regain their freedom of movement. For above knee amputees, that sense of freedom comes from confidence in every step. And confidence begins with trust in the knee.
Prosthetic Feet
At Active Life, we know that the right foot makes everything else possible. The most sophisticated knee technology needs the right foot to perform to its best. The most advanced hip prosthesis depends on a foot to deliver its full potential.
Socket Solutions
There is nothing more important that the comfort of your socket. Whether it’s the liner protecting your skin, or the accessories that enable you to live life on your terms, Active Life has options that allow you to choose what works best for you.
Get Fitted for a Prosthesis
Everyone has a different anatomy, but also a different lifestyle and different wishes. A prosthesis is therefore tailor-made especially for you. The measurement is always done in consultation with you, your rehabilitation doctor, your orthopedic advisor and prosthetist. This way you can be sure that you get the prosthesis that suits you best.
FAQ
How can I exercise with a prothesis?
Start with good advice. Consult with your prosthetist. They can properly assess whether your prosthesis is suitable for the sport you have in mind. An expensive sports prosthesis is really not necessary for most recreational forms of sports. Good advice and a small adjustment to your daily prosthesis – such as mounting a toeclip for cycling – is often sufficient.
Let yourself be guided. It may be wise to be guided by a physical therapist. Think of drawing up a good build-up schedule together with achievable goals and preventing injuries.
Take good care of your residual limb and prosthesis. Exercizing will put more stress on both your residual limb and your prosthesis. Inspect and take good care of your residual limb and contact your advisor or doctor immediately if you have any doubts or complaints. And always clean your prosthesis well after exercizing and have it checked regularly.
How can I best care for my residual limb?
For optimal wearing comfort of your prosthesis and to prevent infections and other complaints, it is important that you take good care of your residual limb.
To help you with that, follow these few tips:
- Wash your residual limb every day. This can be done without soap, or with a mild soap. Use plenty of water so that no soap residue remains. The skin around the residual limb must also be kept clean and dry to prevent infections. In warm weather it is wise to wash your residual limb more often.
- It is better not to use body milk or other skin products on your residual limb before putting on the sock or liner. That can cause irritation.
- If you are not wearing your prosthesis, we recommend that you wear a shrinker sock. This ensures that your residual limb stays in shape, which is important for the wearing comfort of the prosthesis. This also applies if you have to lie in bed for a long time due to circumstances.
- Check your residual limb every day for pressure sores. You can recognize a pressure spot by red spots on the skin. This is especially important if you are wearing a prosthesis for the first time. Do you find a red spot that does not disappear within a few days, or do you have a wound? Please contact your orthopedic advisor immediately.
How do I maintain my prothesis?
A prosthesis is a valuable asset in all respects. Proper maintenance of your prosthesis is good for wearing comfort and for the longevity of use. You can of course always ask Ottobock.care for advice. To help you on your way, we give you a few tips below. Do you have specific questions about the maintenance of your prosthesis? Please contact your orthopedic advisor.
Five tips for maintaining your prosthesis:
- Clean the socket daily with a damp cloth. If you want to clean the socket intensively, you can use a disinfectant if necessary. In that socket, make sure that you thoroughly clean the socket afterwards with a damp cloth. Allow the socket to dry thoroughly before donning the prosthesis. If your socket is covered, for example with leather, do not use alcohol, water or soap. If you use a liner with a pin system, we recommend that you thoroughly vacuum the adapter of the pin system (in the socket) once a week with the vacuum cleaner.
- Also clean the inside of the liner every night. Always use unscented soap for this. Perfume can damage the material of the liner and thus cause skin irritation. After cleaning, rinse the liner with lukewarm water until all soap residue is gone. Finally, pat the liner dry with a lint-free cloth and let the liner dry further on the plastic stand, with the fabric cover on the outside.
- Never expose the liner to heat, heating or sunlight for extended periods. The material of which the prosthesis is made cannot withstand this well.
- Do not disassemble your prosthesis yourself. The parts are attached to each other in a special way by an expert. If there is something wrong with your prosthesis, do not try to solve it yourself, but contact your Ottobock.care adviser.
- Your prosthesis is designed to withstand the same forces as normal human limbs. Too much force can damage your prosthesis. If you have a profession or practice a sport that involves more force than is typical, please report this to your prosthetist.
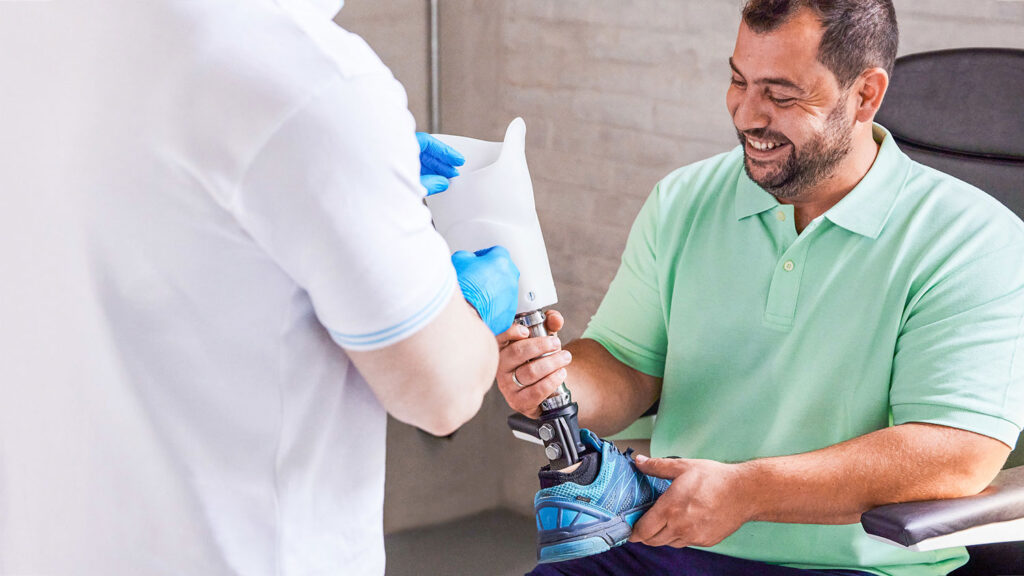
How is a prothesis fitted?
A prosthesis is fitted by making an impression of your residual limb, using a plaster model or a digital scan or on the basis of measurements.
We will then make a fitting appointment with you. During fitting, we carefully check the fit and position and adjust them where necessary.
If the prosthesis fits well, you and your prosthetist will practice with your new prosthesis. During this practice phase you will learn to handle your prosthesis independently and it will be optimally adjusted. The length of the exercise program differs per prosthesis and per person.
Will my prosthesis be covered by my insurance provider?
Both leg prostheses and arm prostheses are reimbursed from the basic insurance.
For each prosthesis, we submit the application to your health insurer. We have contracts with all health insurers in the United States. All we need from you to submit your application is a prescription from your doctor – or your medical indication.
How is a prosthetic leg attached?
There are different systems for attaching a prosthetic leg to your residual limb. For all systems, the most important parts are the liner and the prosthetic socket.
Liner
The liner is a stocking made of silicone – or gel material – and is rolled over your residual limb. This creates a vacuum between the residual limb skin and the inside of the liner. The prosthesis is attached to the liner. The liner also protects the residual limb, which improves the wearing comfort of your prosthesis.
Prosthesis Socket
The prosthetic socket is a custom-made hard socket that is placed over the liner around your residual limb.
Think of the socket as the suspension system of the prosthetic leg. There are five systems for attaching the prosthetic socket to a residual limb.
- Pin suspension
- Vacuum Suspension
- Condyle suspension (anatomical shape of the residual limb)
- KISS system (Velcro suspension)
- Lanyard suspension (liner with string)
The ‘correct’ suspension depends on your residual limb shape, residual limb length, your health, muscle strength and personal wishes. With the right suspension you prevent the prosthesis from sinking and walking costs as little energy as possible. Ask your advisor what is the best solution for you.
Confirm lower leg prosthesis
There are a number of ways to suspend a lower leg prosthesis.
Liner with pin
The lower leg prosthesis is attached to the liner with a pin system. The pin is on the end of the liner. As soon as you step into the prosthetic socket, the pin clamps into a locking mechanism at the bottom of the socket. Remove the prosthesis leg by pressing a button on the outside of the prosthesis.
Liner with sleeve
A sleeve is an extra vacuum sleeve that is rolled over your residual limb and attached to the outside of the sleeve. When you step into the prosthetic socket with the liner (without pin) a vacuum is created by the extra stocking on the outside. An exhaust valve at the bottom of the shaft pushes excess air out of the system while running.
Liner with rubber ring on the outside (seal-in)
A rubber ring on the outside of the liner and an ejection valve at the bottom of the prosthetic socket work together to create a vacuum in the socket when walking. By spraying alcohol spray into the tube, it is easier to get in with the non-slip rubber ring, the air can escape through the ejection valve and the rubber ring creates a vacuum with the hard tube. The residual limb with liner is then suspended in the tube and can be removed by pressing the button on the valve.
Active vacuum system
Like the sleeved liner, the active vacuum system uses a pinless liner and a sleeve. The pump mechanism in the lower leg tube or prosthetic foot actively extracts air from the socket while walking.
Lanyard suspension (liner with string)
The liner is attached to the tube by a rope mechanism (Lanyard suspension). This string is screwed to the end of the liner that you wear around your residual limb. The string runs out through an opening in the bottom of the prosthetic socket. By pulling the string, the residual limb is pulled into the prosthetic socket. When the residual limb is properly seated in the socket, secure the string.
Suspending a lower leg prosthesis using the anatomical shape of the residual limb (KBM principle)
A prosthesis does not need to be attached with a liner. By making clever use of the anatomical shape of the knee, the prosthesis can be attached to your residual limb (condyle fitting).
Condyle Fitting
The leg is slightly narrower above the knee than the knee itself. By making the tubular shape in such a way that it runs in above the knee, it remains attached to it: the KBM principle. This system is called condyle fitting and uses a soft inner tube with butt socks and a hard outer tube. An extra elastic stocking or sleeve can be used for even better hold or a firmer feeling.
Suspending an upper leg prosthesis using a vacuum
There are a number of ways to suspend a thigh prosthesis.
Liner with rubber ring on the outside (seal-in)
A rubber ring on the outside of the liner and an ejection valve at the bottom of the prosthetic socket work together to create a vacuum in the socket when walking. By spraying alcohol spray into the tube, it is easier to get in with the non-slip rubber ring, the air can escape through the ejection valve and the rubber ring creates a vacuum with the hard tube. The residual limb with liner is then suspended in the tube and can be removed by pressing the button on the valve.
Liner with pin
The lower leg prosthesis is attached to the liner with a pin system. The pin is on the end of the liner. As soon as you step into the prosthetic socket, the pin clamps into a locking mechanism at the bottom of the socket. Remove the prosthesis leg by pressing a button on the outside of the prosthesis.
KISS system (Velcro suspension)
The liner is fitted with Velcro. When putting on the leg prosthesis, the Velcro is pulled out through the bottom of the socket. The Velcro goes through a kind of pulling eye and is folded back on the same strap. At the top of the front of the liner is a teardrop-shaped piece of Velcro. The strap has an eye – the towing eye – that sticks to the liner. The tube therefore has two pulling eyes: one at the bottom and one at the top of the front.
Suspending a thigh prosthesis without a liner
It is also possible to attach the prosthesis to the residual limb without a liner. Without a liner, the residual limb goes directly into the prosthetic socket. Due to the soft muscle tissue of the thigh residual limb, this provides sufficient vacuum.
Vacuum on bare skin
To be able to wear the prosthesis around bare skin, first pull a double-walled pull-on bag made of parachute fabric around the residual limb. With this you step into the prosthetic socket. While leaning on the prosthesis, pull the pull-on bag completely out through the valve hole and the residual limb sits at the bottom of the prosthesis socket. Then the valve hole is closed with a cap of the ejection valve.
A prothesis for the first time
Learning to wear a prosthesis takes a lot of time and practice. One of the things you have to learn to deal with is that you have no feeling in your prosthesis. For example, if you wear a prosthetic foot, you won’t feel like you’re walking on gravel, grass, or a wobbly boulder. A prosthetic foot does not transmit these signals to your brain. You should therefore practice a lot to avoid unsafe situations.
A prosthesis is not water resistant
Whatever prosthesis you wear, it is important that you know that it cannot go under water. To shower and swim with your prosthesis, you can do two things. You can use a special bath prosthesis or you can wear a protective cover around your prosthesis. You can also use special non-slip feet to prevent slipping in wet areas.
One year warranty
The warranty against manufacturing and material defects on your prosthesis is one year. Your advisor will ensure that you always have a properly functioning prosthesis under all circumstances.
Resources
Watch Ottobock's in-depth tutorial on how to don a prosthetic socket
Learn some quick tips and best practices for keeping your liner clean
Exercises for optimizing gait with lower limb orthoses and prostheses
Find valuable resources, local support communities, and news in amputee community through the Amputee Coalition